Chromatin Immunoprecipitation Sequencing (ChIP-seq)
ChIP-seq (chromatin immunoprecipitation followed by sequencing) finds where a particular protein sits on the genome. That protein might be a transcription factor bound to a promoter or enhancer, or a histone carrying a particular chemical mark. Unlike the assays before it, ChIP-seq isn't used to read a sequence. The information is in where the reads land.
This page runs a little ahead of the rest of the guide. ChIP-seq is mostly used to study epigenetics: how cells switch parts of the genome on and off without changing the DNA sequence itself. We haven't covered how that works yet, so some of what follows will feel thin. We've included ChIP-seq anyway for completeness, and we'll get around to explaining epigenetics properly one day.
What It Measures
ChIP-seq measures binding: which stretches of DNA were attached to the chosen protein in the cells when they were collected. It's used for two main kinds of target:
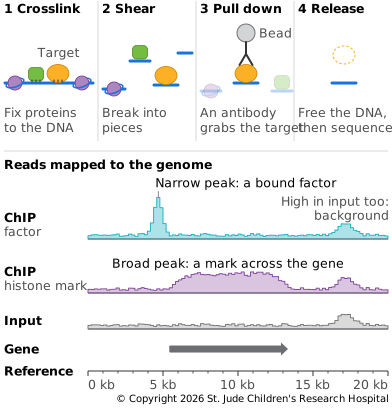
- Transcription factors. They bind short, specific sequences and turn genes on or off. Their binding sites show up as sharp peaks of reads, a few hundred bases wide.
- Histone marks. These are chemical tags added to the histones that DNA wraps around. Different marks go with active promoters, active enhancers or silenced regions, so mapping them shows how each part of the genome is being used. Some marks cover narrow regions, others spread over whole genes.
How the Library Is Made
ChIP-seq takes several steps before the usual library preparation (Landt et al., 2012):
- Crosslinking. Cells are treated with formaldehyde, which fixes proteins to the DNA they're touching.
- Shearing. The chromatin is broken into small pieces, usually by sonication.
- Pulling down. An antibody, a protein that recognizes only the target, is used to pull out the target protein along with the DNA fixed to it. Everything else is washed away. This is the immunoprecipitation step.
- Releasing. The crosslinks are reversed, freeing the DNA, which is then made into a library.
A control is sequenced as well, usually DNA taken before the pull-down step, called input. Some regions give more reads in any experiment, because they break more easily or are easier to read, and the control shows which peaks are just that background.
Choosing the Antibody
The antibody decides what the experiment finds. Antibodies are proteins the immune system makes to recognize one particular shape, usually a small part of a larger molecule. The ones used in the lab are typically made by giving the target, or a piece of it, to animals such as rabbits or mice. An antibody can still grab proteins that look like its target, or hold its target too weakly to pull it out, and the label on the tube won't say which. When ENCODE tested 227 commercial antibodies against transcription factors, only about 20% passed its checks and worked for ChIP-seq (Landt et al., 2012). Antibodies for histone marks have the same problem. Of more than 200 tested, over a quarter failed basic checks that they recognized only their mark, and more than 20% of the rest then failed in ChIP (Egelhofer et al., 2011).
So labs test an antibody before trusting its peaks, and often try several against the same target to find one that works. ENCODE asks for at least two kinds of evidence (Landt et al., 2012):
- The right protein. The antibody should pick out one main protein of the expected size from the cell's proteins.
- A second opinion. Two antibodies that recognize different parts of the same protein should find the same peaks. The peaks should also fade if the cells are made to produce less of the target.
- A tag instead. When no good antibody exists, the target's gene can be edited to add a short tag to the protein, and a well-tested antibody against the tag pulls it down.
Even the same product can vary from batch to batch, so ENCODE tests each new batch as if it were a new antibody.
Depth and Read Setup
Reads are mapped to the reference, and the places where they pile up well above the control are called peaks. Depth is counted in reads. ENCODE's current standards ask for at least 20 million usable fragments per replicate for a transcription factor, and up to 45 million for histone marks that spread over broad regions (ENCODE). ENCODE also expects each experiment to be done at least twice, and keeps the peaks that agree between the two.
Tradeoffs
Pros
- Where proteins bind. ChIP-seq shows where a protein binds to DNA, across the whole genome in one experiment.
- Factors and marks. The same method maps both transcription factors and histone marks, given a good antibody for the target.
Cons
- It's only as good as the antibody. An antibody that also grabs other proteins gives false peaks, and a weak one gives few peaks at all.
- Binding isn't the same as doing. A transcription factor bound near a gene isn't proof that it controls that gene.
- It needs many cells. Standard ChIP-seq needs far more cells than a small biopsy provides. Newer methods such as CUT&RUN cut out the bound DNA in place inside the cell, and work with fewer cells and fewer reads (Skene and Henikoff, 2017).
Example: Mapping a Gene Switch
ChIP-seq was first published in 2007. One of the first studies mapped NRSF, a protein that keeps genes for nerve cells switched off in other kinds of cells. It found NRSF bound at 1,946 places in the genome (Johnson et al., 2007). Another study the same year mapped 20 different histone marks across the genome of human T cells, showing which marks go with active and silent genes (Barski et al., 2007). Large projects such as ENCODE have since mapped hundreds of transcription factors and marks in many kinds of cells.